A NavigationRouter for SwiftUI’s NavigationSplitView
SwiftUI ships two great building blocks for multi-column apps: NavigationSplitView
for the columns and NavigationStack for push/pop inside a column. They work
beautifully in isolation. The trouble starts when an app grows: navigation logic
leaks into dozens of views through NavigationLink, each column owns a slice of
the state, and “select a row here, replace the detail there, but only when we’re
in three-column mode” becomes a tangle nobody wants to touch.
This post describes a small pattern I use in a production music app and have extracted into a tiny open-source sample, BooksNavigation. It centralises navigation into three pieces and supports both three-column (sidebar + list + detail) and two-column (sidebar + full-width detail) layouts from a single source of truth.
For this pattern I took inspiration from the excellent NavigationPath routing tutorial by Natascha Fadeeva.
The sample is deliberately small — an offline library of books and authors, no networking, no dependencies — so the pattern is the only thing on screen.
🔗 Sample code: github.com/…/BooksNavigation Targets macOS and iPadOS (the regular, multi-column size class).
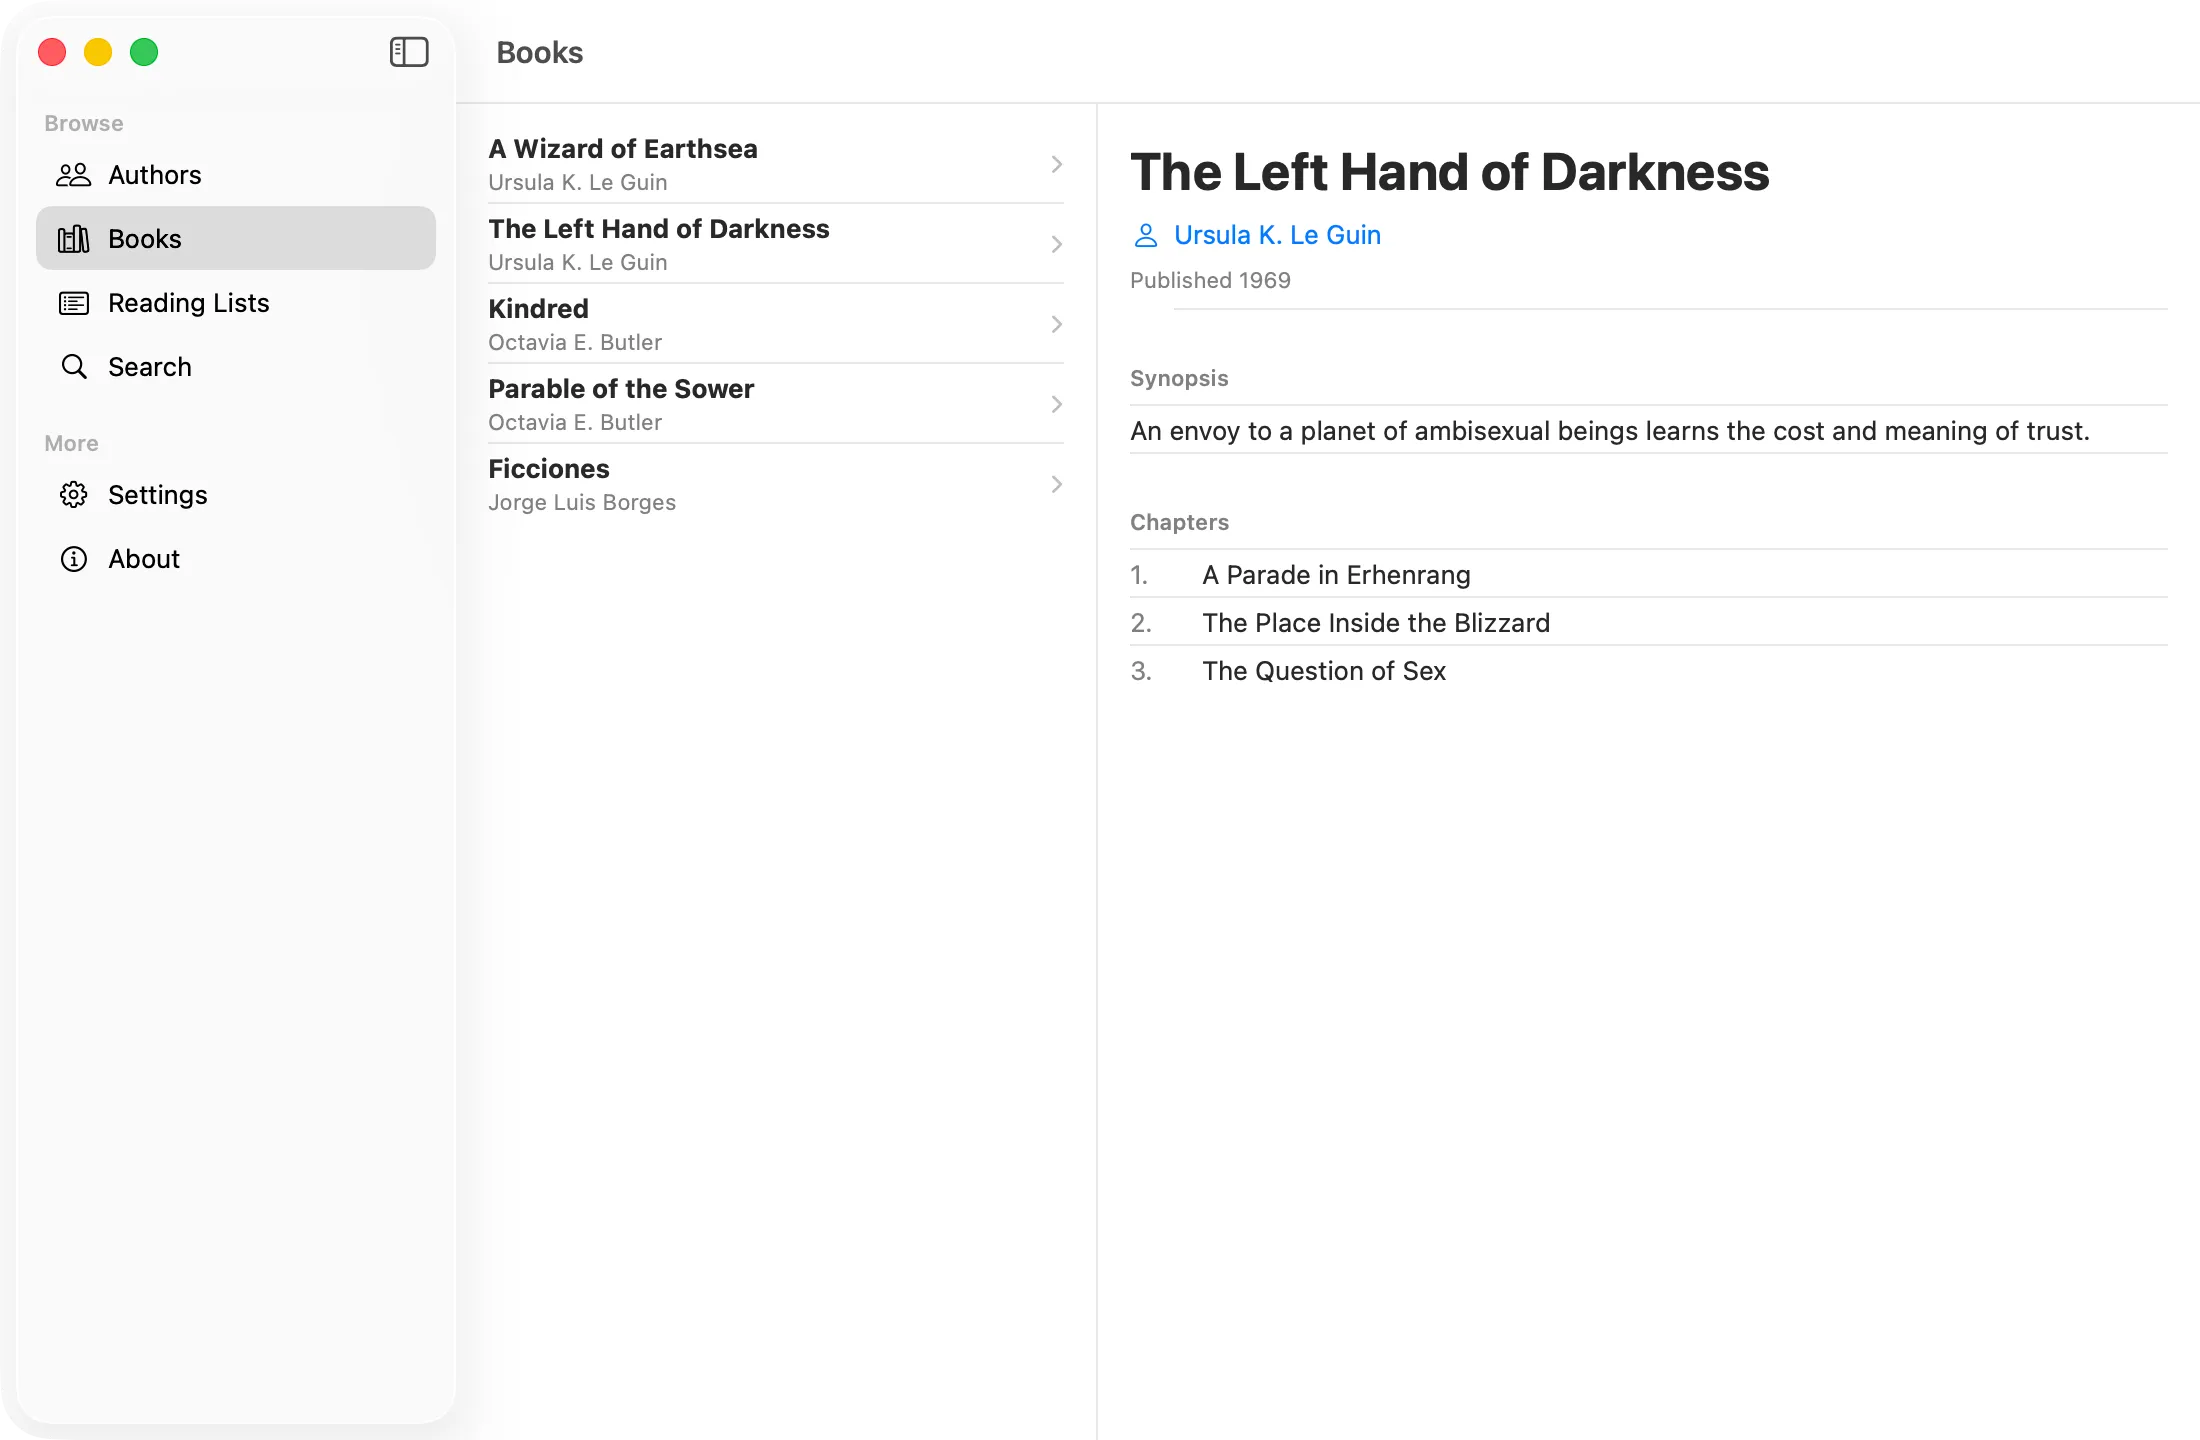
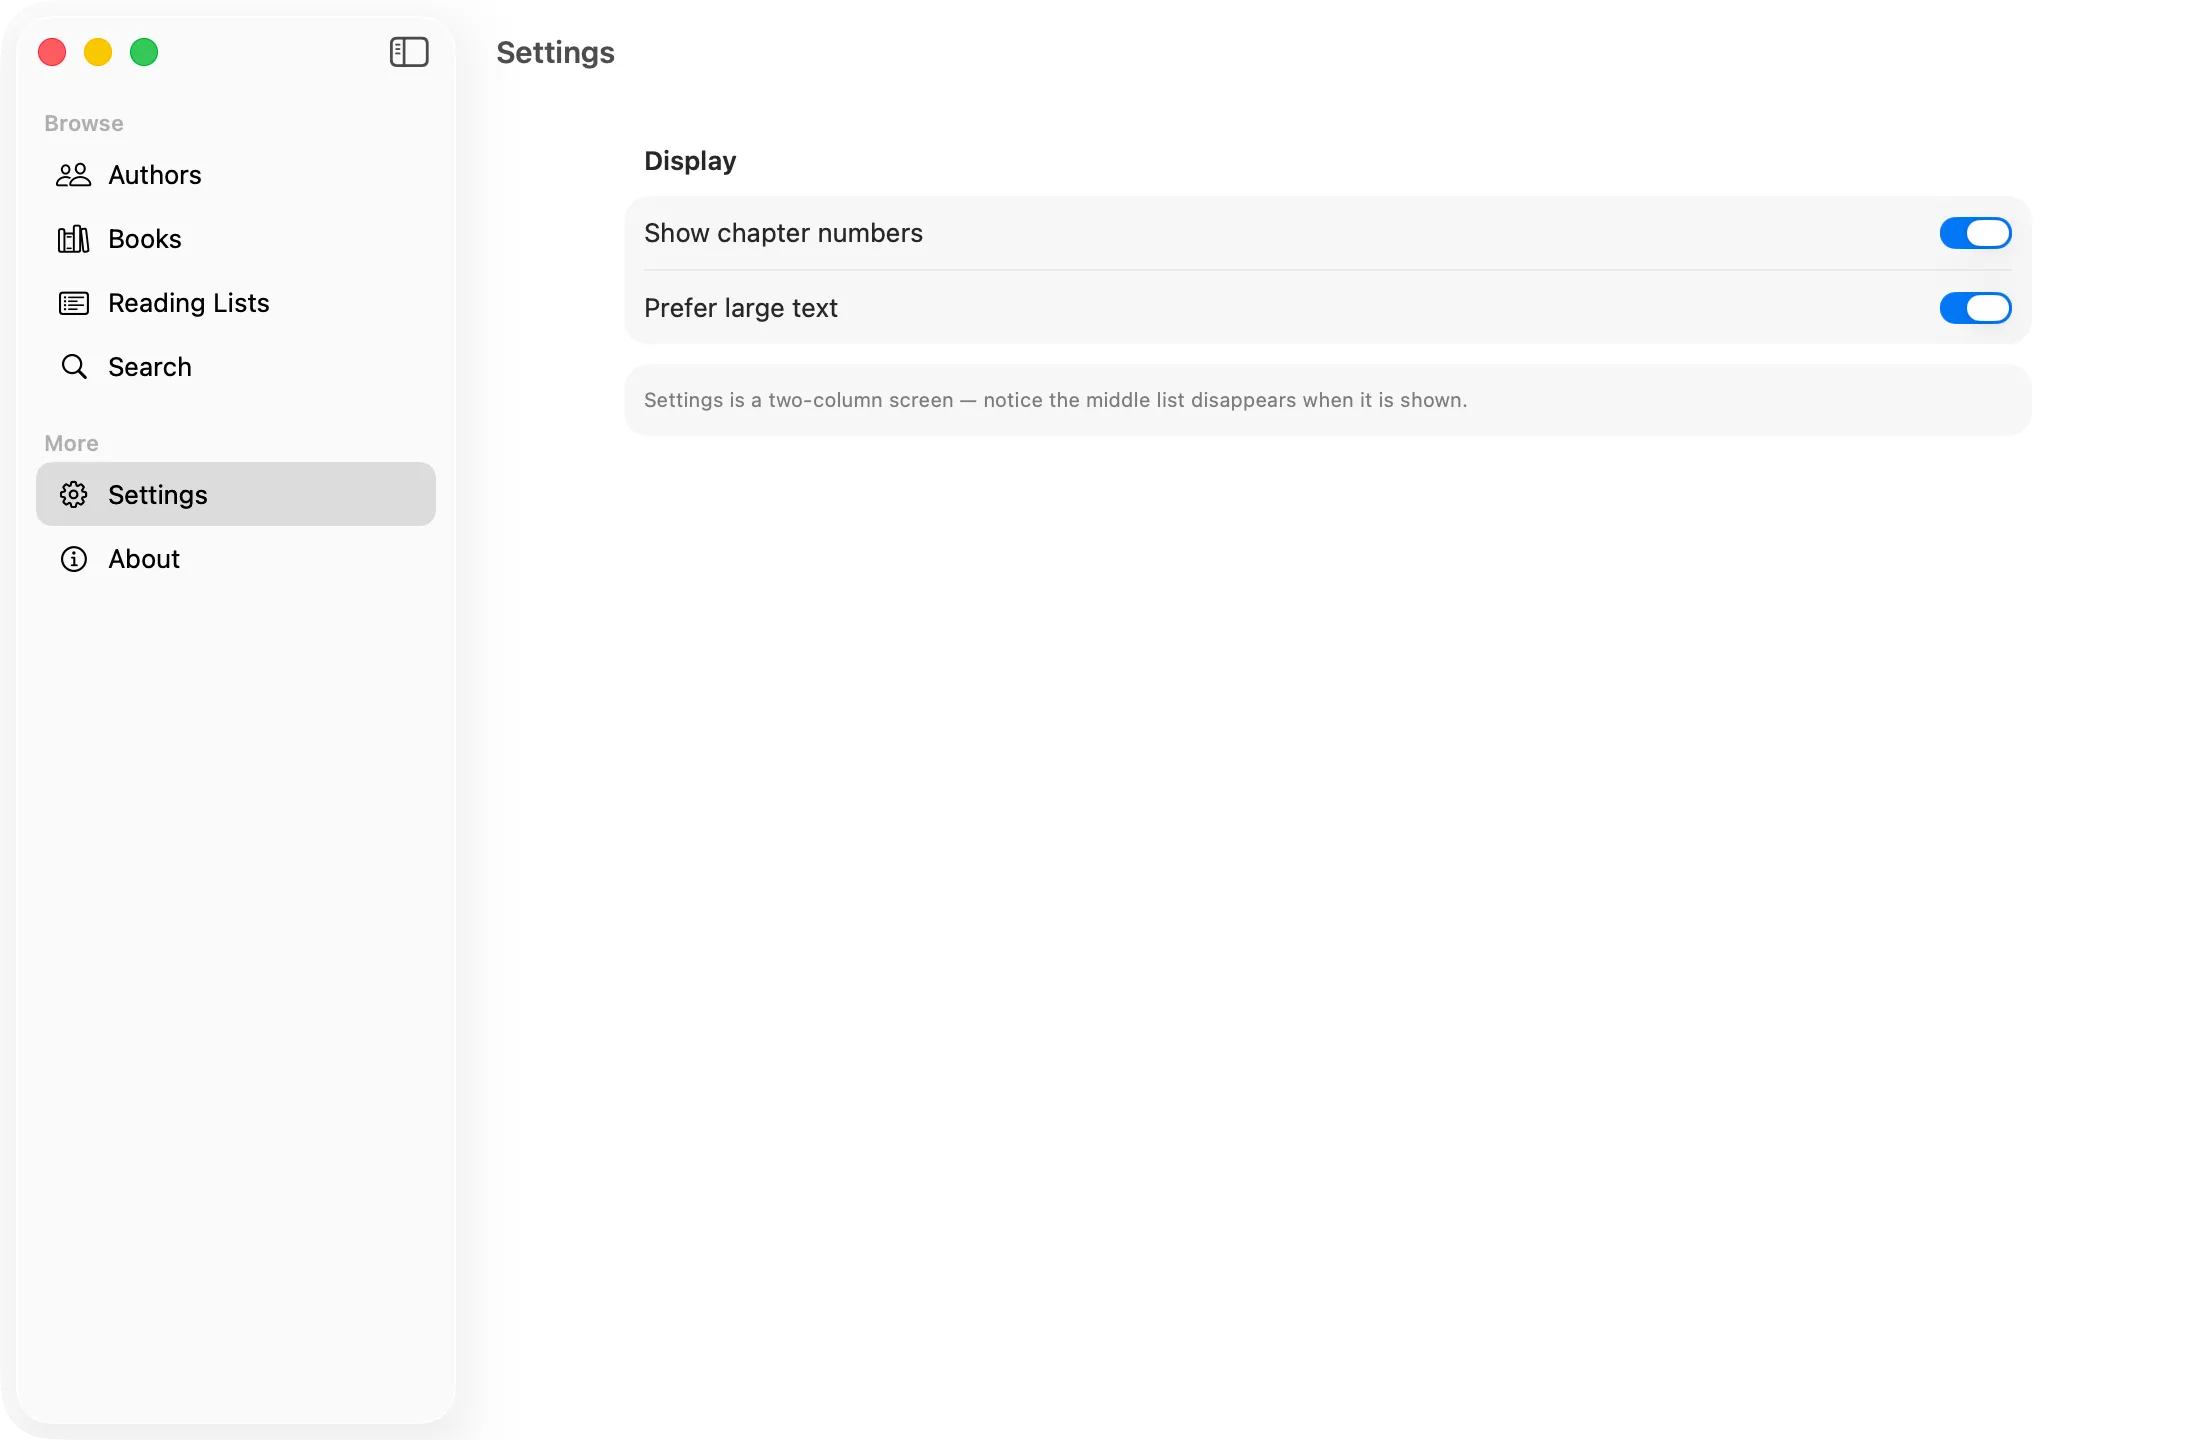
The two layouts
Some destinations have a natural middle-column list — Authors leads to an authors list, then to one author in the detail column. Others — Settings, About — have no list at all and should simply fill the space beside the sidebar. The same app needs to flip between these two shapes seamlessly. The screenshots below show an example of both layouts.
The idea in three pieces
1. One Hashable enum as the navigation vocabulary
Every place the app can show is a single enum case. Associated values carry the
payload.
enum NavigationItem: Hashable, Identifiable {
    // Middle-column lists
    case authors
    case books
    case readingLists
    case search

    // Detail-column destinations
    case author(Author)
    case book(Book)
    case bookByAuthor(Book, Author)
    case readingList(ReadingList)

    // Full-width (two-column) destinations
    case settings
    case about

    // Placeholder for the empty detail column
    case selectSomething(label: String, systemImage: String)

    var id: Self { self }
}
Because every associated value (Author, Book, ReadingList) is itself
Hashable, Swift synthesises Hashable and Equatable for the whole enum.
No hand-written == or hash(into:). This is worth dwelling on: the enum is the
single currency that flows through List(selection:), NavigationStack paths,
and navigationDestination — all of which require Hashable — and you get that
conformance for free.
Each case also carries its own metadata. The most important is how many columns it wants:
extension NavigationItem {
    var numberOfColumns: Int {
        switch self {
        case .settings, .about: return 2
        default:                return 3
        }
    }
}
…plus the bits the sidebar needs to render a row:
extension NavigationItem {
    static let browseCases: [NavigationItem] = [.authors, .books, .readingLists, .search]
    static let otherCases:  [NavigationItem] = [.settings, .about]

    var displayName: String { /* … */ }
    var iconName: String    { /* … */ }
}
2. A router that owns the state and exposes intent
The router is an @Observable @MainActor class. It holds three pieces of state
and nothing about how they’re displayed:
@Observable
@MainActor
final class NavigationRouter {
    var contentRoot: NavigationItem = .authors          // the middle column
    var detailRoot:  NavigationItem = .selectSomething(  // the detail column root
        label: "Select an Author", systemImage: "person")
    var detailStack: [NavigationItem] = []              // pushed on top of detailRoot
}
Views never mutate a NavigationStack path directly. They call intent
methods:
extension NavigationRouter {
    /// Called when the user picks a sidebar item.
    func setContentRoot(_ item: NavigationItem) {
        detailStack = []
        switch item {
        case .authors:
            contentRoot = .authors
            detailRoot  = .selectSomething(label: "Select an Author", systemImage: "person")
        case .books:
            contentRoot = .books
            detailRoot  = .selectSomething(label: "Select a Book", systemImage: "book")
        // …reading lists, search…

        // Two-column items have no middle list; they fill the detail.
        case .settings: detailRoot = .settings
        case .about:    detailRoot = .about

        default: contentRoot = item
        }
    }

    /// Replace the detail root — used when a middle-column row is tapped.
    func setDetailRoot(_ item: NavigationItem) {
        detailStack = []
        detailRoot  = item
    }

    /// Push onto the detail column's stack.
    func push(_ item: NavigationItem) {
        detailStack.append(item)
    }
}
The distinction between setDetailRoot and push is the whole game:
- Selecting a row in the middle column replaces the detail root
(
setDetailRoot). Picking a different author swaps the detail; it doesn’t pile authors onto a back stack. - A link inside the detail column pushes (
push). From a book you can jump to its author, then to another of their books, walking a real back stack.
The router also hosts the one place that turns a NavigationItem into a
view:
extension NavigationRouter {
    @ViewBuilder
    func view(for item: NavigationItem) -> some View {
        switch item {
        case .authors:                   AuthorListView()
        case .books:                     BookListView()
        case .readingLists:              ReadingListsView()
        case .search:                    SearchView()
        case .author(let author):        AuthorDetailView(author: author)
        case .book(let book):            BookDetailView(book: book)
        case .bookByAuthor(let book, _): BookDetailView(book: book)
        case .readingList(let list):     ReadingListDetailView(list: list)
        case .settings:                  SettingsView()
        case .about:                     AboutView()
        case .selectSomething(let label, let image):
            SelectSomethingView(label: label, systemImage: image)
        }
    }
}
Every column and every navigationDestination routes through view(for:), so a
destination renders identically no matter how it was reached. Add a screen once;
it works everywhere.
3. A host that switches between two and three columns
RegularContentView makes exactly one structural decision: read
detailRoot.numberOfColumns and pick the matching NavigationSplitView.
struct RegularContentView: View {
    @Environment(NavigationRouter.self) private var router
    @State private var columnVisibility = NavigationSplitViewVisibility.all

    var body: some View {
        if router.detailRoot.numberOfColumns == 3 {
            NavigationSplitView(columnVisibility: $columnVisibility) {
                sidebar
            } content: {
                NavigationStack {
                    router.view(for: router.contentRoot)
                }
                .navigationSplitViewColumnWidth(min: 280, ideal: 320, max: 380)
            } detail: {
                detailColumn
            }
        } else {
            NavigationSplitView(columnVisibility: $columnVisibility) {
                sidebar
            } detail: {
                detailColumn
            }
        }
    }

    // The detail column is identical in both layouts.
    private var detailColumn: some View {
        NavigationStack(path: detailStackBinding) {
            router.view(for: router.detailRoot)
                .navigationDestination(for: NavigationItem.self) { item in
                    router.view(for: item)
                }
        }
    }

    private var detailStackBinding: Binding<[NavigationItem]> {
        Binding(get: { router.detailStack },
                set: { router.detailStack = $0 })
    }
}
Two things make this clean:
- The detail column is written once (
detailColumn) and reused in both branches. Switching between two and three columns never duplicates the stack logic. - The branch is driven by data on the destination, not by scattered
if-checks in views. Want a new full-width screen? Return2fromnumberOfColumnsand you’re done.
The sidebar is an ordinary selection list that reports back through the router:
struct SidebarView: View {
    @Environment(NavigationRouter.self) private var router
    @State private var selection: NavigationItem?

    var body: some View {
        List(selection: $selection) {
            Section("Browse") {
                ForEach(NavigationItem.browseCases) { item in
                    Label(item.displayName, systemImage: item.iconName).tag(item)
                }
            }
            Section("More") {
                ForEach(NavigationItem.otherCases) { item in
                    Label(item.displayName, systemImage: item.iconName).tag(item)
                }
            }
        }
        .navigationTitle("Books")
        .onAppear { selection = router.derivedMenuItem }
        .onChange(of: selection) { _, new in
            if let new { router.setContentRoot(new) }
        }
    }
}
That derivedMenuItem maps current state back to the row that should look
selected — important after a programmatic navigation or state restore:
var derivedMenuItem: NavigationItem {
    switch detailRoot {
    case .settings: return .settings
    case .about:    return .about
    default:        return contentRoot
    }
}
How a navigation flows end to end
Sidebar selection ─► router.setContentRoot(item)
                       • sets contentRoot (middle list)
                       • resets detailRoot to a placeholder
                       • Settings/About skip the middle list → 2 columns

Row in middle list ─► router.setDetailRoot(.book(book))   // replaces detail root
Link inside detail ─► router.push(.author(author))        // pushes on the stack
A concrete trip:
- User taps Authors in the sidebar →
setContentRoot(.authors). Middle column shows the authors list; detail shows “Select an Author”. - User taps Ursula K. Le Guin →
setDetailRoot(.author(leguin)). Detail column now shows her page. - User taps A Wizard of Earthsea →
push(.bookByAuthor(book, leguin)). The book detail slides in; Back returns to the author. - User taps Settings in the sidebar →
setContentRoot(.settings). Because.settings.numberOfColumns == 2, the host drops the middle column and Settings fills the space.
No view in that sequence touched a NavigationStack path. They all spoke to the
router.
Why bother?
- One source of truth. All navigation state lives in the router. It’s trivial to log, snapshot, deep-link into, or restore.
- No
NavigationLinksprawl. Rows call intent methods, so the same tap can mean “replace the detail” in three-column mode and “push” in a collapsed layout without rewriting the row. - Add a screen once. A new destination is one enum case + one line in
view(for:). It’s instantly reachable from any column. - Layout is data-driven. The two/three-column choice is a property on the destination, not branching scattered through the view tree.
Trade-offs and honest caveats
- The enum grows. In a large app
NavigationItembecomes a big type. That’s usually fine — it’s the index of your app’s surface area — but it is a central file many features touch. - Synthesised conformance has limits. The moment a case carries something
not
Hashable— an existential likeany SomeProtocol, or a closure — you lose synthesis and must hand-write==/hash(into:)/id. My production app does exactly this for a few cases; the sample stays clean precisely because its payloads are plain value types. Keep payloadsHashablefor as long as you can. - It’s a deliberate detour around
NavigationLink(value:). You give up some of SwiftUI’s automatic plumbing in exchange for explicit, centralised control. For a single-stack app that’s a poor trade; for a multi-column app that has to reshape itself, it pays for itself quickly.
Compact / iPhone
The sample targets the regular size class on purpose. When space gets tight —
iPad split-screen, or an iPhone — NavigationSplitView already collapses to a
single stack on its own, so the same router still works without a dedicated
compact UI. If you want a bespoke TabView for compact width, the payoff of
this pattern shows up again: it’s the same NavigationItem vocabulary and the
same view(for:) factory, just hosted differently.
Get the code
The full sample is on GitHub: BooksNavigation. It’s
about 400 lines, builds for macOS and iPadOS, and has no dependencies. Clone it,
open it in Xcode, and step through setContentRoot / setDetailRoot / push to
watch the columns rearrange themselves.